If you have read my first article in the series, I might have been able to convince you of executable processes. In this part I would like to go a step further and show you with Restzeebe how concrete tasks within processes are executed by a workflow engine. All my examples use Camunda Cloud. I don’t know of any other solution that executes workflows modeled in BPMN in the cloud.
But now to the real thing. How can you teach a workflow to executes a specific task? I don’t want to go into too much detail, but with Camunda Cloud it works like this: Zeebe, the underlying engine, uses a pubsub system for workers. A worker is essentially the software that executes your specific code. A worker registers to the engine and waits to get tasks assigned.
The workers themselves can be implemented in any programming language, for languages like Java, NodeJS or Go there are already libraries that simplify the integration.
The promise from my first article is still valid: you don’t have to code anything for this exercise either. Log in to Restzeebe again and navigate to the Workers section. There you will find three examples that temporarily run a worker in the background, connecting to your cluster and waiting for work.
Random Number
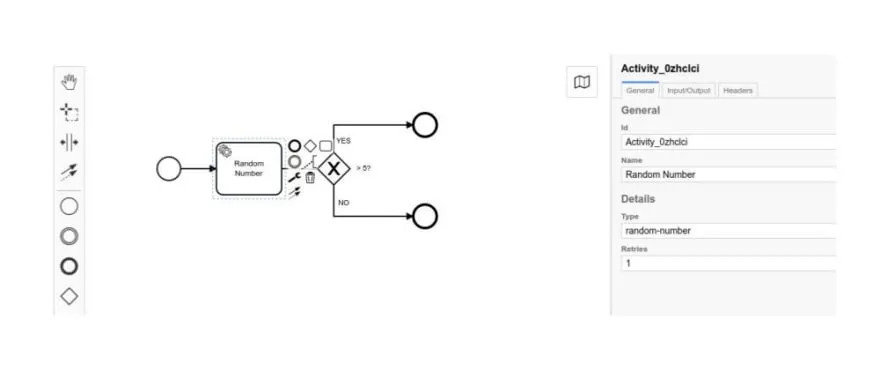
In the first example the worker determines a random number and returns this number to the started instance. This number is written to the process context and will be checked in the following gateway whether the number is greater than 5 or not. Each example contains three actions that can be triggered:
deploy: Deploy the BPMN diagram to your cluster.start: Start a new instance of the BPMN diagram.worker: A worker registers for a few seconds to your cluster and executes the code.
Execute the first two steps and switch to Operate. With Operate you can see all deployed BPMN diagrams and completed/running instances. So after the second step a new instance has started and is waiting in the node Random Number. The process does not continue because a worker has to execute the corresponding task first. If you now let the worker run you will notice that the instance continues running after a short time and finally terminates.
The NodeJS implementation is very simple for this worker:
const { ZBClient } = require("zeebe-node");

function createWorkerRandomNumber() {
  // initialize node js client with camunda cloud API client
  const zbc = new ZBClient({
    camundaCloud: {
      clientId: connectionInfo.clientId,
      clientSecret: connectionInfo.clientSecret,
      clusterId: connectionInfo.clusterId,
    },
  });

  // create a worker with task type 'random-number'
  zbc.createWorker({
    taskType: "random-number",
    taskHandler: async (job: any, complete: any, worker: any) => {
      try {
        const min =
          job.customHeaders.min && job.customHeaders.max
            ? Number(job.customHeaders.min)
            : 0;
        const max =
          job.customHeaders.min && job.customHeaders.max
            ? Number(job.customHeaders.max)
            : 10;
        const randomNumber = Math.floor(Math.random() * (max - min + 1) + min);

        complete.success({
          randomNumber,
        });
      } catch (error) {
        complete.failure(error);
      }
    },
  });
}
The task type is configured in the attributes of a service task in the BPMN diagram:

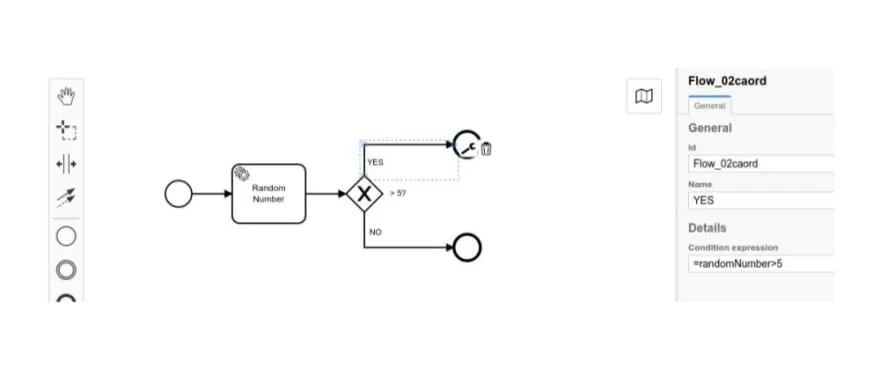
The same applies to the gateway. In this case we want to attach the condition to a variable on the process context, which was set by the worker. The two outgoing paths of the gateway are configured as follows:

# NO
=randomNumber<=5
and
# YES
=randomNumber>5
There is nothing more to tell. But you see how easy it is to write a simple worker and use the result in the further process.
Increase Number
The second example is also quite simple. It represents a simple loop. The corresponding worker implementation looks like this:
const { ZBClient } = require("zeebe-node");

function createWorkerIncreaseNumber() {
  const zbc = new ZBClient({
    camundaCloud: {
      clientId: connectionInfo.clientId,
      clientSecret: connectionInfo.clientSecret,
      clusterId: connectionInfo.clusterId,
    },
  });

  zbc.createWorker({
    taskType: "increase-number",
    taskHandler: async (job: any, complete: any, worker: any) => {
      const number = job.variables.number ? Number(job.variables.number) : 0;
      const increase = job.customHeaders.increase
        ? Number(job.customHeaders.increase)
        : 1;

      try {
        const newNumber = number + increase;
        complete.success({
          number: newNumber,
        });
      } catch (error) {
        complete.failure(error);
      }
    },
  });
}
The Worker is structured in the same way as the first example. The main difference is that it uses a value from the process context as input. This value is incremented at every execution. What can be seen too: the abort criterion is not part of the worker implementation. The worker should concentrate fully on his complex (haha) task:
i++;The abort criterion is modeled in the process, and that is exactly where it belongs to. Because when we model processes, we want to be able to read the sequence from the diagram. In this case: When is the loop terminated?
Webhook.site
This is my favorite example in this section. It shows a real use case by executing an HTTP request. To see the effect the service from Webhook.site is used for this. You will get an individual HTTP endpoint which you can use for that example. If a request is sent to the service you will see a new entry on the dashboard.
To make this example work with your individual Webhook.site the Webhook Id must be set accordingly. Below the start action you will find an input field where you can enter either your Id or your individual Webhook.Site URL. Restzeebe extracts the Id from the URL accordingly.
The underlying worker code now looks like this:
import axios, { AxiosRequestConfig, AxiosResponse } from 'axios'
const { ZBClient } = require('zeebe-node')

function createWorkerRandomNumber() {
    const zbc = new ZBClient({
          camundaCloud: {
            clientId: connectionInfo.clientId,
            clientSecret: connectionInfo.clientSecret,
            clusterId: connectionInfo.clusterId,
          },
        })

    zbc.createWorker({
        taskType: 'webhook',
        taskHandler: async (job: any, complete: any, worker: any) => {
          const webhookId = job.customHeaders.webhook
            ? job.customHeaders.webhook
            : job.variables.webhook
          const method: 'GET' | 'POST' | 'DELETE' = job.customHeaders.method
            ? (String(job.customHeaders.method).toUpperCase() as
                | 'GET'
                | 'POST'
                | 'DELETE')
            : 'GET'

          try {
            if (!webhookId) {
              throw new Error('Webhook Id not configured.')
            }

            if (!method || !['GET', 'POST', 'DELETE'].includes(method)) {
              throw new Error(
                'Method must be set and one of the following values: GET, POST, DELETE'
              )
            }

            const url = 'https://webhook.site/' + webhookId
            const config: AxiosRequestConfig = {
              method,
              url,
            }
            const response: AxiosResponse = await axios(config)

            complete.success({
              response: response.data ? response.data : undefined,
            })
          } catch (error) {
            complete.failure(error)
          }
        },
    })
}
Under the hood, Axios is used to execute the HTTP request. The Worker is designed in a way that you can configure the HTTP method yourself. To do this, you must download the BPMN diagram, navigate to the Service Tasks Header parameters and set a different method.
I like this example for several reasons, but the most important one is: if you already have a microservice ecosystem and the services interact via REST it is a small step to orchestrate the microservices through a workflow engine.
Challenge
Maybe you are curious now and want to get your hands dirty? Restzeebe offers a little challenge at the end. Again, no code is necessary, but you have to model, configure, deploy and start an instance by yourself. Camunda Cloud comes with an embedded modeler that you can use for this. I won’t tell you which task it is ;) But there is a Highscore, where you can see how you compare to others ;)
Have fun!


